How to Replace a Packing (2)
Check the Pump Conditions
In this step, you should check mainly two items: shaft runout and stuffing box wear. Excessive roughness or wear, as a result of corrosion, the packing seizing to the shaft or turning inside the stuffing box, must be eliminated. About 1/16" of wear on a 1" to 2" shaft and 1/8" wear on a 3" to 4" shaft is the maximum that can be tolerated. If the wear is greater than this, the pump should be scheduled for shaft or shaft sleeve replacement. Roughness in the stuffing box can be removed by metal spraying and turning on a lathe or by replacing the stuffing box. The allowable amount of stuffing box wear is the same as discussed above for shaft wear.
Installing New Packing
Note: the cutting ends of the rings must be parallel! Cut enough rings to fill the box before you install any.
If you have no individual rings in hands, you should cut the packing into individual rings from a roll. The most common cutting method is to wrap the packing several times around a mandrel and then making a "butt cut"quot; or "scarf cut."quot; In addition, it is nearly impossible to pull the packing as tight as it will be in the stuffing box. When installed in the stuffing box, the rings ends should be parallel but not touching or just barely touching. They should be no more than 1/16" to 1/8" apart. Therefore, the mandrel should have a circumference 1/16" to 1/8" shorter than that of the pump shaft; otherwise the packing tings will be too long when installed in the stuffing box.
- An alternative method used by some operators is as follows:
- Cut the end of the packing at a slight angle.
- Make one wrap around the shaft and mark the packing with a knife. The mark should be next to the cut end.
- Remove the packing and lay it out on a board.
- Cut the packing 1/16" to 1/8" short of the mark.
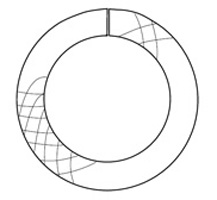
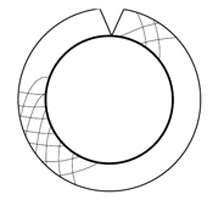
Regardless of the method used, the packing should never be laid out flat on a board and cut square, which will result in a joint that will not seal as shown in the picture.
 |
 |
|
Parallel End |
Straight Cut |
Completing the Installation
During the installation, the users should follow these steps:
- Lubricate the first ring with a pre-lube such as Teflon or silicon grease. If the stuffing box is formerly lubricated with grease or oil, you should continue using the same lubricants.
- Install the first packing ring by starting on one end and coiling the other end around the shaft until the two ends meet.
- The first packing ring should be pushed into the bottom of the stuffing box with wooden blocks or with split packing gland sleeves.
- Each successive ring should be rotated 90° so that the joints are 1/4 turn apart. Each of those rings should be lubricated and seated with a wooden block or split packing gland sleeve. If a lantern ring is involved, check its location by either passing water through the seal water line, or in the stuffing box.
- After all rings have been installed, the packing gland should be replaced. If you have the proper number of rings of the right size packing installed, the gland should extend into the stuffing box 1/8~1/4 inches.
Start-up Procedure
The start-up is the last but no less important step during the whole procedure of packing replacement. The packing's life can be extended or destroyed in this period of several minutes. Please complete this step with care.
- Tighten the packing gland with an end wrench and then back it off so that it is finger tight.
- Check to see if the shaft can be rotated by hand.
- If seal water is present, turn it on and allow it to run for 15 minutes. If there's no seal water, turn the water on and allow it to run through the pump for 15 minutes with the pump in off state.
- Check the packing gland. It should still be finger tight. If not, loosen it before proceeding.
- Start the pump and allow leakage from the stuffing box for 15 minutes before the gland is tightened.
- Adjust the gland bolts one flat (1/6 turn) every 15 minutes until the leakage is controlled to the proper amount.
Prev: How to Replace a Packing (1) Next: Packing Failures and Troubleshooting for Sanitary Pumps